Saturday, October 24, 2009

Shevai usli

Health-0-meter: 4/5 (5 being the healthiest)
Ease: 4/5 (5 being the easiest)


I love shevai and shevai usli. The form of shevai most often eaten by Konkanis is made from a rice and coconut paste of sorts that is cooked and then pressed through a dye to get long thin noodles. Shevai usli (usli meaning spiced mix) is made using wheat noodles. I'm not familiar with the process of making the wheat version, but I know it's sold in a dried form in India. My parents always buy packs and packs of them so it looks like this favorite runs in the family! :)

This is a perfect recipe if you're looking for a quick and hearty breakfast that doesn't require a lot of talent to make. The bulk of the prep lies in rehydrating the noodles.

Ingredients:
  • 4 cups dried shevai noodles (will yield ~1 cup cooked shevai per person for 2 people)
  • 1 tbsp oil
  • 1/2 tsp mustard seeds
  • 1/2 tsp jeera (cumin) seeds
  • 3-4 dried red chillies
  • 3-4 curry leaves
  • 1/4 tsp asafoetida powder (heeng)
  • 1 tsp shredded unsweetened coconut
  • salt

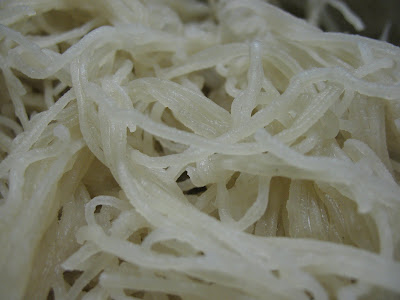
1. Rehydrate noodles in room temperature water. Place noodles in bowl and fill with water until noodles are completely covered. Noodles are ready when they feel flexible and feel soft enough to chew (usually about 30 minutes). They will also change color and become a lighter shade of brown.


rehydrated shevai

2. Place 1 tbsp oil in a pan. When oil is hot, add mustard seeds and cumin seeds. When mustard seeds begin to pop, add dried red chillies and curry leaves. Fry for 10 - 15 seconds and add noodles. Add salt and asafoetida powder. Stir until mixed. Garnish with shredded coconut.


Spices used (L-R): dried red chillies, cumin seeds, mustard seeds, curry leaves, shredded coconut

What did I tell you? Quick n' easy. Once the noodles are rehydrated, it's about 10 minutes to get to the fully cooked stage. So, in under an hour, you have a hearty and authentic breakfast for 2 or more!

'Til the next dish...

Sunday, September 20, 2009

Spicy curried potatoes

Health-0-meter: 3/5 (5 being healthiest)
Ease: 1/5 (5 being difficult)


I love potatoes. Hand me a freshly baked, salted and peppered potato and I will be your friend forever. A little S&P goes a long way, but it can get boring, which is where our good friends the spices step in!

While in Vegas, I happened to eat at an Indian restaurant and tasted something similar to this dish. It was pretty bland in my opinion, but it inspired me to make a more flavorful version. So, here it is! This is incredibly simple to prepare. It really doesn't need any culinary skill at all, which is why it's in my go-to recipe box when I'm out of ideas for lunch or dinner.


Ingredients:
  • 2-3 medium or large potatoes
  • 1/2 tsp mustard seeds (available at any Indian grocery store)
  • 1/2 tsp cumin seeds
  • 1-2 green chillies, chopped
  • 2 tsp Cumin & Coriander powder (1 tsp of each if you have the individual powders; Coriander is also known as Cilantro)
  • 2 tsp turmeric powder
  • 1 tsp red chilli powder
  • 1 tbsp finely chopped Cilantro
  • 1/2 tsp salt (more or less, depending on your taste)
  • 2.5 tsp vegetable oil

1. Boil potatoes until fork tender. Cut into bite size pieces.

2. Place the oil in a skillet or wok and heat to high temp. Olive oil isn't the best choice of oil here as it has a low boiling point, meaning that high heat will cause it to scorch. Once the oil is hot, place the mustard and cumin seeds in the oil. The mustard seeds should sputter; once they're mostly done, add the green chillies and saute for a few seconds.

3. Add potato cubes to the oil. Gently stir potatoes so that they are all covered in the oil. Fry for 30 seconds, before gently stirring again. Once potatoes have browned on one side, add the remaining spices, except for the minced cilantro. Make sure the spices are evenly distributed; let potatoes sit for 4-5 minutes.

4. Add minced cilantro and gently stir to distribute. Let sit for 1-2 minutes. Serve warm with rice or roti/naan.

Tips & Tricks: I cook potatoes in a pressure cooker (30 minutes total cooking time, 5 - 7 minutes on high heat, with the remainder at medium heat). After the potatoes are cooked, place them in the fridge for 5 - 10 minutes. When they are a little cooler, it is easier to remove the skins without getting potato flesh all over your hands. Potatoes cooked this way keep in the fridge for up to a week.

If mustard seeds are unavailable, they can be omitted. The flavor will be slightly different, but still delicious.

Calories:

*Calculations made with 2 medium and 1 large Russet potatoes. This makes enough for three generous 1/2 cup servings.

Potatoes: 625
Canola oil: 100
Spices: 25
Total: 750 calories, one serving: 250 calories

Pizza!

Health-0-meter: 3/5 (5 being healthiest)
Ease: 3/5 (5 being difficult)


Man, do I love me some pizza! I never realized how much of a pizza-holic I was until I moved to NC. Not only do we buy a couple of frozen pizzas (individual sized only because our freezer isn't big enough) but I make pizza once a week. Actually, I make pizza if my basil plant is being good and grows enough leaves to make fresh pesto (another post). Alright, so I love pizza. Let's get into the recipe...

Ingredients:

1.5 cups flour
1 tsp salt
3/4 tsp active dry yeast
1 tbsp olive oil
1/2 cup warm water

*For a slightly thicker crust pizza, use the following recipe (same instructions as below):

2 cups flour
1.5 tsp salt
1 tsp active dry yeast
1 tbsp olive oil
2/3 cup warm water


You have to arrange your ingredients like so, or it won't turn out right. I keed, I keed.

1. Place flour, salt and yeast in a bowl. Mix well.


This is not mixed well, but it will be.
2. Make a well in the middle of the flour mix and pour olive oil and warm water. I don't use a thermometer, so I say the water is warm when I feel the warmth but it doesn't turn my palm red. If the water is too hot, you'll know because your dough will refuse to rise since you killed all the yeast.

3. Once it's all mixed together (you might need a tbsp or so more of flour if the dough is really wet), sprinkle flour on the counter and knead the dough for 2-3 minutes. Not long. You'll get your workout after it has risen.

Sticky dough.

4. Oil the bowl in which you made the dough. It shouldn't have lots of pizza dough stuck to the inside because that means your dough is too sticky and needs some flour.

Place your dough into the bowl and roll it around a few times to get a light film of oil over it. Cover with a towel and let it sit for 2 hours or until doubled in volume.
Like so:

5. Place your palm on the surface and gently press on the dough to release the air. Also called "punching" the dough. Sprinkle flour on your work surface (counter) and knead the dough for a good 5 minutes. At this point, I like to sprinkle a good bit of finely minced fresh rosemary, dried basil or oregano. That way you get a spiced dough. Really quite good!

6. After the dough has been kneaded, shape it into a round ball and cover it with the towel again for 20 minutes. In the meantime, preheat your oven to 550 for brick oven-style pizza or 450 for a slightly softer pizza, chop up your veggies and make your sauce.

Ready to roll.

7. Roll out the dough to approximately 10" if you want a thin crust or 8" if you want a thicker crust. Spread your sauce, sprinkle your toppings and place it on a piece of parchment paper on a baking sheet. For brick oven style (550F), bake for 8 minutes. For a slightly softer crust (450F), bake for 10 - 12 minutes and then broil until the crust turns golden brown.

Enjoy! 'Til the next dish...

Wednesday, July 29, 2009

Sheera

Health-0-meter: 2/5 (5 being healthiest)
Ease: 1/5 (5 being difficult)

Sheera is my favorite Indian dessert of all time. It's served at religious rites (pujas) as well. The ingredients change depending on the rite (e.g chopped bananas). I always thought it was this intensely caloric comfort food, which it can be, but I did the nutritional analysis on my version and it wasn't too bad! Yay! More for me... :)

Ingredients:

Sooji/Rava - 1 cup
Ghee/butter - 1 tbsp
Sugar - 1/2 cup
Cardamom pods - 3*
Milk - 1 cup
Raisins - 1/4 cup
Almonds - 10 or 12, sliced or chopped into pieces
Cashews - 10 or 12, sliced or chopped into pieces

Almonds and cashews can be added in whatever quantity you like. I'm not a big fan of either in the raw form, but hubby loves them so I added the quantity called for in the recipe. If I was making it for myself, I would probably just put a couple of almonds.

*A note on cardamoms: They seeds you want are in the pods (see pics below). Use a rolling pin and crush the pods so that they open. Once open, take out the seeds within and discard the husks. Use the rolling pin to crush the seeds into a fine powder. Doesn't take more than a couple of minutes. Another option - you can leave the seeds as is, but I don't like it whole, so I tend to add the powdered version.


Raw sooji available in any Indian grocery store. This is the fine version, best used in sheera.


Cashews, almonds and cardamoms.

This little guy was naturally opened, giving us a peek into his heart. That's what the seeds look like.

Method:

1. Toast the nuts in a frying pan. No oil is needed. Keep stirring the nuts for 1 -2 minutes. You shouldn't have them turn a golden brown - that means they're too well done. It doesn't look very different from the raw form, but the taste between raw and toasted makes a world of a difference!


Toasted almonds and cashews (sorry for the blurry pic).
2. Add the tbsp of ghee or butter to the pan. As soon as it is done melting, add the sooji. Stir so that the ghee is completely mixed with the sooji. It will have the appearance of wet sand. Keep stirring for 4-5 minutes until it is toasted, at which point it will smell slightly nutty. Can't describe it, but you will get a faint [delicious] aroma. Toasting is very important! If the sooji isn't toasted, it could result in soggy sheera (blech).
While the sooji is toasting, bring the cup of milk to a low boil in a pot on another burner. It should not bubble, but it should be warm.
Toasty, toasty.
4. Add the cardamom powder or the whole seeds to the toasted sooji and stir until fully incorporated. The recipe I used added raisins to the sooji. I like raisins to be plump and juicy in the sheera so I added them to the milk while it was heating.


Almost there!

5. Add the milk to the pan containing the sooji. It will sputter at first, but will calm down in a minute. Mix thoroughly and stir in the sugar at this point. If the sugar is added before the milk, then it might caramelize due to the heat of the pan. Keep stirring until the mixture looks like raw cookie dough. Then take it off the burner and let it sit.


All done!


One serving of sheera right into my gaping maw. Yum!

And you're done! The whole process took me 20 minutes, so it's definitely easy to make and delicious to eat.

On to the nutritional analysis. The original recipe called for 3 tbsp of ghee and 3/4 cup of sugar. I cut the sugar to 1/2 cup and the ghee to 1 tbsp. I'm glad I did because it came out to the exact consistency that I love. :) I'm also the only Indian I know of who doesn't like her desserts on the sweet side. I'd like to take this opportunity to blame my mom as she brought my sis and me up with lo-everything - low fat, low sugar. I guess that's why I just couldn't accept the 3 tbsp even though I insist on following recipes to the letter when I make them for the first time. Hehehe... thanks Mom. :)

This recipe makes 2.75 cups of sheera. A serving size was designated as 1/2 cup.

  • Raisins, 1/4 cup (130)
  • Skim Milk, 1 cup (90)
  • Sugar, 1/2 cup (360)
  • Ghee, 1 tbsp (123)
  • Sooji, 1 cup (330)
  • Almonds & Cashews (170)
  • Cardamoms, 3 crushed (6)

Total calories: 1215

Calories per serving: 220 (see, not bad huh?)

'Til the next dish...

Sunday, June 28, 2009

Pancakes!

Health-o-meter:3/5 (5 being healthiest)

Ease: 1/5 (5 being difficult)

Ahhhh, pancakes. Fluffy, pillowy cakes dripping with sweet maple syrup. It's The American Breakfast. I've always used a pancake mix to make pancakes. I tried to make them from scratch once and they were rubbery and awful. I have since stuck to the mix...until now. I've been inspired by all these other blogs that I read to make my food from scratch. So...I've decided to start with the easiest, although a little tricky, recipe: Pancakes.

I got the recipe from allrecipes.com. It received 5-star reviews with almost all the reviewers saying this was the best-tasting and fluffiest pancake. I did a little additional research on making pancakes, that I believe made them come out as fluffy as can be. I'll share those tips as we make our way through the recipe.

Supposedly, this recipe made 8 pancakes. I got 12. Next time, I'll cut the recipe in half since I have some extra that no doubt will get inedible by the time we are in the mood to snack on pancakes.


First, the dry ingredients (this will make 12):

  • 1.5 cups all-purpose flour
  • 3.5 tsps baking powder
  • 1 tsp salt
  • 1 tbsp sugar

The wet ingredients:

  • 1.25 cups milk, slightly warmed
  • 1 egg (room temperature)
  • 1.5 tbsp butter (melted)
  • 1 tsp vanilla

The original recipe called for 3 tbsp of butter. When I saw how much that was, I cut it down to half. I think next time I'll omit it all together and see what happens. I didn't feel like it tasted buttery or needed that butter flavor.


1. In a standard mixing bowl, whisk all dry ingredients - flour, baking powder, salt and sugar. If possible, sift all ingredients. This has been suggested as a tip to make pancakes fluffy. I just whisked the dry ingredients for a couple of minutes and made sure it was all mixed and ours came out fluffy.


2. In a second mixing bowl, whisk all wet ingredients - egg, milk, butter and vanilla. To bring the egg to room temperature quickly, run it under warm tap water for a minute or so. Microwave the milk for 30 sec. Melt the butter using the microwave as well. Whisk all wet ingredients very well. I start out beating the egg and making sure there are lots of air bubbles. Then I add milk and vanilla, with the melted butter added last.


3. After the wet ingredients are mixed well, pour into the bowl containing the dry ingredients. This may seem like a waste of time, but the separation of wet and dry ingredients is what makes pancakes an "easy" recipe as opposed to "tricky". If the wet ingredients are directly added to the dry ingredients, and then whisked, the batter will end up tough because of the gluten that has formed. To minimize gluten formation, whisk the wet ingredients separately and then add it to the dry ingredients, whisking gently until the batter comes together. I whisked the batter for 2-3 minutes, even though there were lumps. Lumps in pancake batter are not an issue, apparently. Mine was very lumpy (I did NOT want rubbery pancakes) and they came out totally fine.


When your batter looks like this:


Closeup of batter
it's ready to go. Let it sit uncovered for 30 minutes at room temperature.


4. Bring a griddle or frying pan to medium-high heat. I use a nonstick griddle so I didn't need oil or butter before pouring batter onto the pan. If you don't have a nonstick griddle - invest in one! - add about 1/2 tsp of oil before pouring batter. Once batter is poured I put a few drops around the edge of the pancake to crisp it up even further. When your pancake looks like this:


Bubble, bubble, toil and trouble...

it's ready to be flipped. After flipping, do NOT press down on it - this will remove any fluffiness that was created! Let it cook for another 30 seconds and then transfer to a plate.


And there you go!! Fabulous, fluffy pancakes. Drizzle with warm maple syrup. For an extra touch of decadence, add a pat of butter on top of the stack. I don't like the taste so I don't add it. Plus, I wanted to keep the health-o-meter within my scale. :)


'Til the next dish...

Saturday, June 27, 2009

Gobi Manchurian

Health-0-meter: 2/5 (5 being healthiest)
Ease: 2/5 (5 being difficult)

I first tasted this dish in India, and found out that it was invented in India for Indians who wanted Chinese food, but with an Indian taste. Sounds weird, but really it's quite a delicious combination!

Last night, I was feeling lazy and not in the mood to cook so we went to an Indian restaurant for dinner. They're one of the few restaurants I know of that have dinner buffets and on a Friday no less! Lucky for us, they decided to feature gobi manchurian on their menu, and I got really excited! Too bad it tasted awful - the cauliflower tasted gummy and the sauce was too thin and had a strong tomato taste. Ugh.

This is the second gobi dish in the last two weeks, so you might be thinking I love this veggie. Well, yes and no. I do love a good cauli dish, for sure, but I had half a head of cauli sitting in the frig and I didn't want it to go bad. Plus, my sis-in-law makes *great* gobi manchu and I had to make good use of the recipe I begged for and got. :)

On to the recipe!

Sauce (traditional):
  • Soy Sauce 1/4 cup
  • Ketchup 1/4 cup
*We didn't have ketchup at home and the hubs was grossed out at the thought of ketchup in his main dish, so we got steak sauce instead. We used 1/2 cup of the steak sauce.


The steak sauce we used


Try it on chicken, steaks, burgers... and indochinese food!

For the rest:
  • Cauliflower, split into florets*
  • 6 green chillies, medium sized**
  • 1 tbsp garlic, grated
  • 1 tbsp ginger, grated
  • 1 tbsp corn oil (or vegetable oil)
*Make sure florets are not too big as they will not cook all the way through when fried. The smaller the better, but that can get too time consuming if there are too many florets.
**Chillies can be added/subtracted according to taste. We found 6 chillies to be perfect. If you want it spicier, add more. If you're not too fond of spice, cut down on the number of chillies.
Garlic/ginger paste can be used, but fresh always tastes better.
Batter:
  • All purpose flour, 1/4 cup
  • Cornstarch, 2 tbsp
  • Salt, to taste
  • Water, 1/4 cup
  • Oil for frying
The ratio of flour to cornstarch is 2:1, if the recipe needs to be scaled up.
1. To make the batter, mix the flour and cornstarch and salt with a whisk. When thoroughly mixed, add the water and use a fork to mix. Batter shouldn't be too thick, i.e. should be able to coat the cauliflower florets without too much of the cauliflower peeking through.


2. Wash the florets and dry them thoroughly. If even slightly wet, they will either not stick to the batter, or will splatter in the oil (bad, BAD situation).

My florets are ready to be dipped and fried!

3. Heat oil in a deep frying pan or wok. Make sure oil is at 350F (use a candy thermometer). If you don't have a thermometer (like me), place a drop of batter into the oil. The oil should bubble furiously around it - that's when it's ready to go. Use a metal slotted spoon with a long handle when frying. Placed fried florets on paper towels to drain while the sauce is made.

Yummy, delicious fried cauliflower

4. Heat 1 tbsp oil in a wok or deep frying pan. Placed the chopped chillies, grated ginger and garlic into the oil and cook until the ginger/garlic is almost brown, but not quite. When it looks like the picture below, it's ready.

5. Add the florets and stir on a low flame. Once the ginger/garlic/chilli mix has sufficiently coated the florets, add the sauce. Make sure the florets are thoroughly coated with the sauce. This is the "dry" version of this dish. More sauce can be added according to personal taste.

And voila! You are done and ready to eat! They came out absolutely perfect and delicious. Try it, you'll love it!

'Til the next dish...

Tuesday, June 23, 2009

Alu Gobi

Health-0-meter: 4/5 (5 being healthiest)
Ease: 2/5 (5 being difficult)

In Hindi, Alu means potato and Gobi means cauliflower. We Indian folk like to name our foods after what it contains. Makes it easier when planning dinner "Hey you guys want alu gobi?" versus "Would you lot care for black pudding?" See what I mean about knowing what's in your food?

Most Indian dishes begin with the trifecta of onions, garlic and ginger. This one is no different. The combined flavors give each curry their distinctive taste that makes them so yummy! The important part is to make sure that the ratio of garlic and ginger is 1:1 and that the onions are cooked thoroughly. Too much of one will overpower the other and will make the dish taste different. Uncooked onions will be noticed, trust me. I was impatient the first time I made it and it tasted really off.

On to the recipe!

You will need:
  • A wok or a pan with at least 2" high sides
  • 1 medium tomato, diced
  • 1 medium potato, diced (bite size pieces)
  • 1/2 lb cauliflower florets (broken into individual florets)
  • 5-6 baby carrots, sliced into rounds
  • 1 medium onion, finely diced
  • 1.5 tsp (2 cloves) garlic, finely minced
  • 1.5 tsp Ginger, finely grated
  • 1 tbsp garam masala
  • 1 tsp turmeric powder
  • 1 tsp red chilli powder
  • 1/2 tsp cumin seeds
  • 2.5 cups of water
  • Salt
  • 1 tsbp of corn oil (or vegetable oil)

A note on ingredients: Everytime I've made this dish, I've used fresh veggies. I'm not sure how frozen veggies would work; I'm guessing they would need to be completely thawed and microwaved to remove any water and then added to the curry for 10-15 minutes before serving for them to take in the spices.

These spices are common in Indian cooking and can be purchased at any Indian store. Eyeballing is key in Indian cooking. If the amounts of ginger and garlic look about the same, it will work out fine. Exact measurements were provided for those incredibly anal-retentive cooks like me.

1. Measure out garam masala, turmeric, chilli powder and cumin seeds. Mince garlic and grate ginger. Finely chop onion. Keep aside.

2. Heat oil in wok/frying pan. Add garlic and ginger and stir rapidly for 20 - 30 seconds. They should NOT turn brown, that means the garlic is burnt and it will impart a bitter taste to the curry.
3. At this point, add the onions. Here's the tricky part. The oil might not seem like it will be enough to cook the onions, however do NOT add any extra oil or your curry will taste oily. Make sure the onions are mixed well enough that the garlic and ginger and oil are evenly distributed. Keep the heat to a medium-high and stir every 2-3 minutes until the onion looks caramelized. Like so:


See how the volume has decreased (water loss) and more importantly, see how they're shiny in the second pic? That's the oil re-appearing! It's a good indication that the onions are done. When they look like the pic above (right), turn the heat down to medium-low and cook for another 2-3 minutes.

4. Add the spices - garam masala, cumin seeds, turmeric and chilli powder. Mix until all the onions are coated with them. Keep stirring for another 2-3 minutes. The spices need the heat of the pan to release their flavor and to get into the onions.

5. Add the tomato and the tomato paste. If stirring is difficult, add about 1/2 cup of water to help stir the mixture. If the onions are well cooked, then adding the water and stirring should result in a paste.

6. Add the vegetables and make sure they are well coated with the paste. Stir for 1 minute.

7. Add water to cover all the veggies (see pic below). At this point, add the salt. Potatoes can absorb a lot of salt, so add a little more than necessary. Leave on medium low for 30 - 40 minutes without a lid to cook. Stir every 5 minutes or so until vegetables are tender and liquid has reduced to half the original volume.

Enjoy! Til the next dish...

Monday, June 22, 2009

The beginning...

My love of cooking started at a young age. As a small child, I remember waking up one night and trotting into the kitchen to make "icing". I took a bowl, dumped sugar, yogurt and ice into it and began mixing furiously. In my naivete, I thought this is what made up icing as it matched the sweetness, texture and temperature. My mom woke up with the noise and asked me what I was doing, to which I replied "I'm making icing!" Needless to say, she wasn't happy. She promised to teach me how to make it in the morning and threw out the mess. I still don't know how to make icing without looking at a recipe, so suffice to say she never taught me how to make it - thanks Mom.

Fast forward a decade or so later, and here I am - newly married and unemployed, with a kitchen all to myself! Paradise! I've decided to start a blog documenting my trials, tribulations and successes on my road to culinary expertise. I have grand plans for this blog. I'm hoping to take beautiful pictures that will provide step-by-step instructions that will help those interested in recreating dishes that I have made. I'm also going to include my mistakes and possible corrections. Maybe include healthier substitutions? Told you my plans were grand.

Til the next dish...


P.S: My sis just sent me a screenshot of my blog as seen in the U.A.E. What do you think?